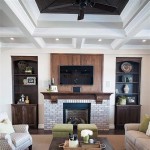
Crown Molding Ideas for Living Rooms: Enhancing Aesthetics and Value
Crown molding, a decorative trim installed where walls meet ceilings, is a classic architectural detail that elevates the aesthetic appeal of any living room. Its addition can transform a plain space into a sophisticated and visually engaging environment. Beyond aesthetics, crown molding can also increase a home's overall value, presenting a compelling investment. The versatility of crown molding allows for a wide range of designs and applications, catering to diverse architectural styles and personal preferences. This discussion will explore various crown molding ideas for living rooms, encompassing material selection, design considerations, and installation tips.
Material Selection for Crown Molding
The choice of material significantly impacts the appearance, durability, and cost of crown molding. Several options are available, each with its own unique characteristics. Understanding the properties of each material facilitates informed decision-making.
Wood: Wood is a traditional choice for crown molding, offering a natural and elegant look. It provides excellent workability, allowing for intricate designs and customization. Common wood options include pine, poplar, oak, and maple. Pine is a cost-effective choice suitable for painting, while hardwoods like oak and maple offer greater durability and stain-grade finishes. The primary disadvantage of wood is its susceptibility to moisture, making it less suitable for areas with high humidity or potential water damage. Expansion and contraction due to temperature fluctuations can also lead to cracks and gaps over time. Proper sealing and painting are crucial for protecting wood crown molding.
Medium-Density Fiberboard (MDF): MDF is an engineered wood product composed of wood fibers bonded together with resin under high pressure. It offers a smooth, consistent surface ideal for painting. MDF is less expensive than solid wood and resists warping and cracking. However, MDF is also susceptible to moisture damage and should not be used in areas with high humidity or potential leaks. It is also heavier than wood, which can complicate installation. When working with MDF, it's important to use appropriate safety equipment, such as a dust mask, as cutting MDF can release fine particles.
Polyurethane: Polyurethane crown molding is a synthetic material known for its durability and resistance to moisture, insects, and rot. It is lightweight, easy to install, and can be painted or stained to mimic the appearance of wood. Polyurethane is an excellent choice for areas prone to humidity or temperature fluctuations, such as basements or bathrooms. It is also a suitable option for intricate designs that might be difficult to achieve with wood. While polyurethane is more expensive than MDF, its durability and low maintenance requirements can make it a cost-effective long-term investment.
Polystyrene: Polystyrene is another synthetic material that is lightweight and inexpensive. It is moisture-resistant and easy to cut and install. Polystyrene crown molding is typically available in simple designs and is often pre-finished. While it is a budget-friendly option, polystyrene is less durable than other materials and may not provide the same level of aesthetic appeal as wood or polyurethane. It is also more prone to denting and scratching. Its ease of installation makes it a viable option for DIY enthusiasts on a tight budget.
Plaster: Plaster crown molding is a traditional option known for its ornate designs and historical accuracy. It is made from a mixture of gypsum, lime, and water, and is typically custom-made by skilled artisans. Plaster molding offers exceptional detail and can be seamlessly integrated into existing plaster walls. It is also fire-resistant and durable. However, plaster molding is expensive and requires professional installation. It is also susceptible to cracking and chipping, especially in areas with movement or settling. The weight of plaster necessitates careful installation and secure attachment to the wall and ceiling.
Design Considerations for Crown Molding
The design of crown molding should complement the architectural style of the living room and the overall aesthetic of the home. Factors such as the size of the room, ceiling height, and existing trim should be considered when selecting a design.
Size and Proportion: The size of the crown molding should be proportional to the size of the room and the ceiling height. In general, rooms with higher ceilings can accommodate larger crown molding profiles. Installing oversized molding in a small room can make the space feel cramped, while undersized molding in a large room can appear insignificant. A good rule of thumb is to choose molding that is approximately 1 inch in height for every foot of ceiling height. For example, in a room with 8-foot ceilings, 8-inch crown molding would be an appropriate size. The proportions of the room's other features, such as baseboards and door casings, should also be considered to maintain a cohesive look.
Style and Detail: Crown molding styles range from simple and minimalist to ornate and traditional. The style of the molding should complement the architectural style of the home. For example, a Victorian-style home might benefit from ornate crown molding with intricate details, while a modern home might be better suited to simpler, more geometric designs. Consider the existing trim in the room, such as baseboards and door casings, to ensure that the crown molding coordinates with the existing architectural elements. A cohesive design throughout the room enhances the overall aesthetic appeal.
Paint and Finish: The paint or finish of the crown molding can significantly impact its appearance. White or off-white paint is a classic choice that complements a wide range of interior styles. It brightens the room and creates a clean, crisp look. Darker colors can add drama and contrast, especially in rooms with light-colored walls. Staining the crown molding to highlight the natural grain of the wood is another option, particularly for homes with a rustic or traditional aesthetic. The sheen of the paint can also affect the appearance of the molding. A high-gloss finish can create a more formal and elegant look, while a matte finish can create a more subtle and understated effect. Consideration should be given to the overall colour palette of the room to ensure the molding integrates seamlessly with the existing decor.
Layering and Combinations: For a more dramatic effect, consider layering multiple pieces of crown molding. This technique involves installing two or more pieces of molding on top of each other to create a custom profile. Layering can add depth and dimension to the room and create a more sophisticated look. Another option is to combine crown molding with other decorative elements, such as picture rails or chair rails. These combinations can add visual interest and create a more personalized space. Experiment with different combinations to find a look that complements the architectural style of the home and reflects the homeowner's personal taste.
Lighting Integration: Crown molding can be used to conceal indirect lighting, creating a soft and ambient glow. This technique involves installing LED strip lights behind the crown molding, casting light upwards onto the ceiling. Indirect lighting can enhance the mood of the room and create a more relaxing atmosphere. It can also highlight architectural features and add visual interest. Consider the color temperature of the LED lights to ensure that it complements the color palette of the room. Warm white light creates a cozy and inviting atmosphere, while cool white light creates a more modern and energetic feel. The placement and intensity of the lighting should be carefully considered to achieve the desired effect.
Installation Tips for Crown Molding
Proper installation is crucial for achieving a professional and aesthetically pleasing result. Whether installing crown molding as a DIY project or hiring a professional, understanding the key steps involved is vital.
Preparation: Before beginning the installation, it is important to prepare the area. Remove any existing trim or molding from the walls and ceiling. Clean the surfaces to ensure that they are free of dust, dirt, and debris. Use a stud finder to locate the wall studs and mark their locations. This will help ensure that the crown molding is securely attached to the wall. It is also important to have all the necessary tools and materials on hand, including a miter saw, measuring tape, level, nail gun, wood filler, sandpaper, and paint.
Cutting and Fitting: Crown molding requires precise cuts to ensure that the corners fit together seamlessly. Use a miter saw to cut the molding at the appropriate angles. Coping is a technique used to create a tight fit at inside corners. It involves cutting the molding at a 45-degree angle and then using a coping saw to remove the back portion of the molding, allowing it to conform to the shape of the adjacent piece. Practice cutting and fitting the molding before installing it permanently. This will help minimize mistakes and ensure a professional-looking result. Precise measurements and accurate cuts are paramount for achieving a flawless finish.
Attachment and Finishing: Once the molding has been cut and fitted, it can be attached to the wall and ceiling using nails or screws. Use a nail gun to drive nails into the wall studs. For added security, apply construction adhesive to the back of the molding before attaching it to the wall. Fill any nail holes or gaps with wood filler and sand smooth. Apply a primer and then paint the molding to match the color of the walls or ceiling. Caulking along the top and bottom edges of the molding will create a seamless transition and prevent drafts. The finishing touches are essential for achieving a polished and professional look. Careful attention to detail during the finishing process will enhance the overall aesthetic appeal of the crown molding.
Addressing Common Challenges: Several challenges can arise during the installation of crown molding, such as uneven walls or ceilings. Use shims to level the molding and create a consistent appearance. For large gaps, consider using backer rod or expanding foam to fill the gaps before applying wood filler. When working with long lengths of molding, it may be necessary to use a second person to help hold the molding in place while it is being attached. Patience and attention to detail are essential for overcoming these challenges and achieving a successful installation. Understanding potential problems and having solutions prepared in advance can save time and frustration.
Crown molding offers a versatile and effective way to enhance the aesthetics of a living room. By carefully considering material selection, design considerations, and installation techniques, homeowners can transform their living spaces into elegant and inviting environments. The addition of crown molding not only elevates the visual appeal of a room but also contributes to the overall value of the home. Careful planning and execution are the keys to achieving a successful and stunning result.
:max_bytes(150000):strip_icc()/6H8A0978-HDR-ASE-photo-by-Melissa-Fitzgerald-West-2000-dd5508da72fd464bb629ac2976a2fca8copy-0d85ae3d91324c11b1f6af6f2797f397.jpg?strip=all "12 Crown Molding Ideas To Spruce Up Your Home")
12 Crown Molding Ideas To Spruce Up Your Home

What Rooms Should Have Crown Moulding The Finished Space

Crown Moulding Ideas Prestige Painting Gta

Crown Moulding Ideas Trim Team

Crown Molding 10 Stunning Ideas

Should I Get Crown Moldings In My House Williams Painting

30 Elegant And Chic Crown Molding Ideas Digsdigs

Top Wall Molding Ideas To Add Character Any Room Decorilla Online Interior Design

31 Beautiful And Chic Crown Molding Ideas Shelterness

Crown Moulding Ideas